SCENARIO 6
COUNTER ATTACK AT FALLUJA
Scenario
This scenario represents a deliberate counter attack involving the attempt by
the Iraqi 6th Brigade to recapture Falluja.
Introduction
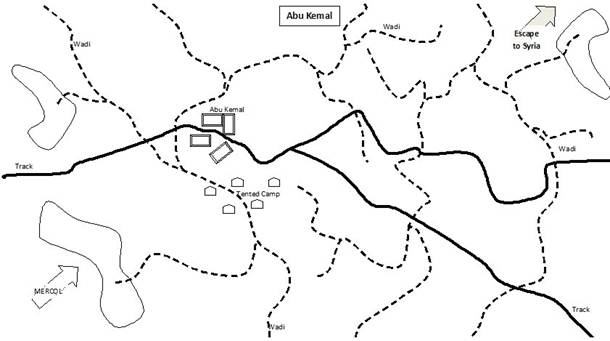
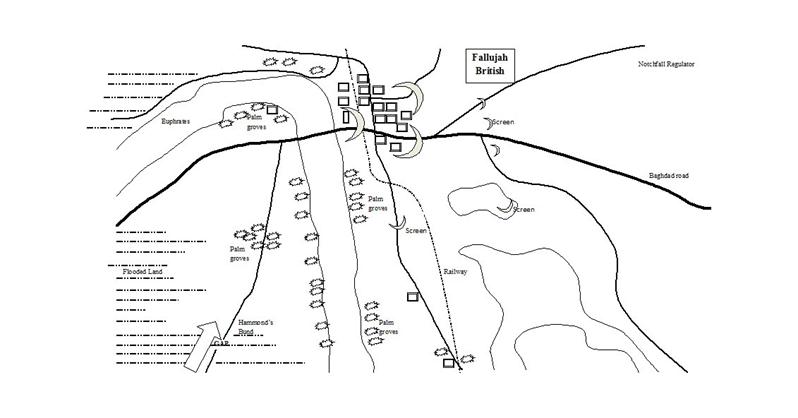
Ground
The set up is similar to that in the last scenario with the action on the
western side of town.
The British have been improving the captured Iraqi positions and adding their
own along the northern and eastern edges of town.
The Iraqis have assembled a mixed arms force based on the 6th
Infantry Brigade supported by tanks, engineers and artillery for the attack.
The attack at 0300 came as a surprise
to the British.
Brit Force Briefing
Mission:
To hold the bridge over the Euphrates intact.
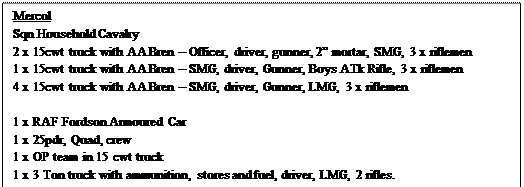
Execution:
Conduct a deliberate defence of the town.
The positions are strongly made and mutually supporting.
In front are belts of barbed wire.
Four target areas are registered Defensive Fire and two as Final
Protective Fire task for the mortars and so they may fire on them at a bonus
despite it being dark.
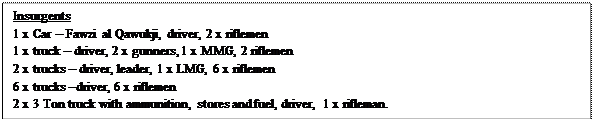
Iraqi Force Briefing
Mission:
To destroy the bridge over the Euphrates at Falluja and hold the town.
Execution:
The Brigade will conduct a deliberate assault from the march in
the dark. Because of the
limitations of navigation in the dark the attacking forces are to be compact.
The vehicles will take the troops to the drop off point as close to the
British line as possible. Vehicles
will move without lights. This will
sacrifice surprise for speed.
Artillery and battalion mortars will provide a short but heavy bombardment as
the attack goes in.

Playing the Game
The British hear the approaching the motor column at about 0230 and so have
manned all their positions.
The British reinforcements arrive d6+2 turns after the Iraqi artillery
bombardment starts. The order of
march, unless otherwise stated, is
Household
The Iraqi player allocates each part of his force a Forming Up Point (FUP) and a
physical objective that can be seen from the FUP.
The Iraqi movement is limited by the dark though the player need not be told.
The speed for infantry and trucks is at a quarter normal rates to allow
for navigation. If this is exceeded
then the unit or subunit may get lost.
Keep a track of where they move and how fast they are going.
When they reach their designated FUP roll a d6:
|
Distance moved |
25% |
50% |
75% |
100% |
|
1 |
Lost |
Lost |
Lost |
Lost |
|
2 |
OK |
Lost |
Lost |
Lost |
|
3 |
OK |
Lost |
Lost |
Lost |
|
4 |
OK |
OK |
Lost |
Lost |
|
5 |
OK |
OK |
OK |
Lost |
|
6 |
OK |
OK |
OK |
OK |
|
|
Deviation |
|
1 |
Left 50% of total |
|
2 |
Left 25% of total |
|
3 |
Over 25% of total |
|
4 |
Under 25% of total |
|
5 |
Right 25% of total |
|
6 |
Right 50% of total |
Until the Iraqis have their OPs in position they may only engage in map or area
fire. Signalling by Very
Light is permitted.
Demolishing the bridge is achieved by having the Iraqi engineer unit of at least
1 officer and 4 men lay the charges on the centre of the bridge.
This takes 2 complete turns once the explosives are in place.
The officer then fires the charge rolling a d6 and it fails only on a 1
unless the charge as laid under small arms fire then it fails on a 1,or 2 and if
under artillery or mortar fire then it fails on a 1,2 or 3.
After a failure the charge must be reset taking another turn once it is
reached by at least one engineer figure.
Winning the Game
The British win if they hold the bridge at the end of the game.
The Iraqis win if they capture or demolish the bridge.
Alternative Actions
This could be fought as a day action.
With air support on both sides and in this case I’d allocate the better
Iraqi aircraft – the Douglas 8A and the Breda Ba-65 to them.
The British would have the usual Blenheims and Gladiators.
Notes
This action may need some force adjustments depending upon the rules that you
use.
Historical Action
The action started with an intense mortar and artillery bombardment on the north
east of the town followed by an infantry assault supported by CV-33 tankettes.
The defenders were pushed back into the houses at the edge of the town
and two of the tankettes and some infantry penetrated the town before being
destroyed. Some heavy close quarter
fighting ejected the attackers. The
British reinforcements were despatched very quickly with Brigadier Kingstone
taking personal command.
The next assault came in on the south east.
This, too, had tankettes support.
The artillery and mortar fire does not seem to have been quite so intense
here. The Essex were pushed back
and then supported by the reinforcements launched a counter attack.
The Iraqis were driven back but held on along the east side of town.
It was not until 2100 that the Iraqi infantry and snipers were finally
evicted from the town.
The battle was hard fought and had it not been for stout defensive action and
the quick despatch of the relief column then it could easily have been an Iraqi
victory.
Iraqi Counter Attack at Fallujah
River Crossing at Habib Shawi and Qrmat Ali